This gadget was one of those things you buy because you think it might be useful, it then turns out to not be useful and then you forget about.
The reason I decided it wasn’t useful was that I simply could not understand the instructions. There seemed to be a lot of functions, but I had no idea how to make them work. One more try, I thought and searched for a better explanation of the functionality.
Fortunately, I found this post which helped a lot
https://www.dyxum.com/dforum/pixel-tw283-intervalometer-review-tutorial_topic130981.html
But I thought I could go better still. So inspired by the above post and with some more experimentation, I tried to come up with a simple guide to using this gadget.
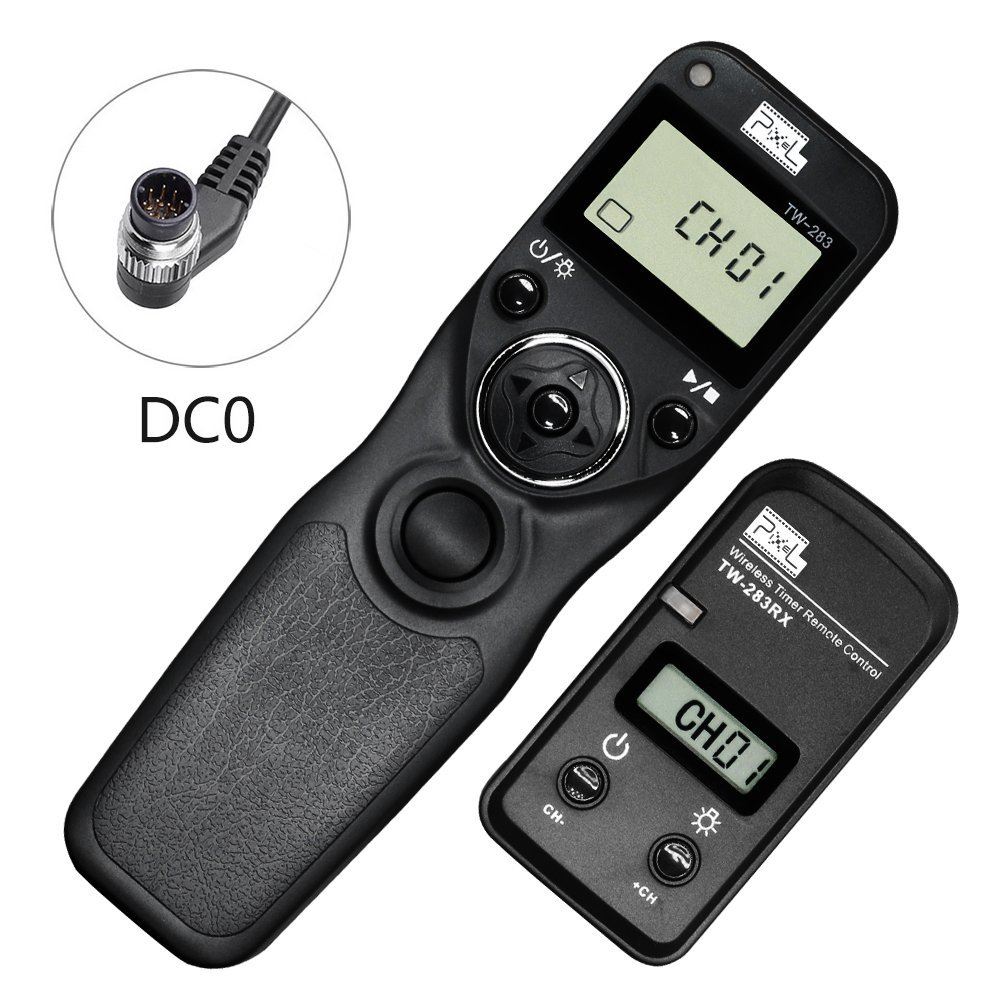
(Just for clarity, I set this gadget up to work with a Canon 6D. I will try to avoid camera-specific instructions but apologies if that accidentally happens).
There are two main parts to the gadget:
Transmitter, which is a handheld remote control.
Receiver, which fits on the camera hot shoe and connects to the camera via a cable. You need to get the right cable for your camera.
To set up, mount the receiver on the hot shoe and connect the cable. Power up by pressing the left button.
Power up the transmitter by pressing the top left button.
The LCD should be active in both units.
Both units need to be using the same communications channel.
Receiver – the channel shows in the LCD. To change it, press both buttons together until the display flashes. Use the left button to count down the channels and the right button to count up. Press both buttons again to lock the channel.
Transmitter – use the right or left shift to move the symbol at the bottom of the LCD to the right, so that it shows CH. Press the Set button in the middle of the shift left/right to unlock the channel. Then use the up or down key to select the same channel as the receiver. Press the Set button to lock the channel.
You are now ready to use the controller.
(If you are using back-button focusing, you will need to focus before using the remote controller).
Single Shot – takes a picture each time you take a picture.
Camera: make sure the camera is in single-shot mode.
Transmitter: use left/right to shift the symbol at the bottom of the LCD to the left (looks like a single screen).
Press the big black button to take the picture.
Continuous Shooting – takes pictures continuously.
Camera: set to continuous shooting mode.
Transmitter: use the left/right to shift to the second symbol to the left (looks like stacked pictures).
Press the big black button and the camera will shoot continuously until the button is released.
Bulb – open the shutter and manually close the shutter.
Camera: set to bulb mode.
Transmitter: use the left/right to shift to the middle symbol (the word BULB).
Press the big black button and to open the shutter, press again to close.
Delay Shooting – multiple pictures are taken after an initial delay.
Camera: make sure the camera is in single-shot mode.
Transmitter: use left/right to shift the symbol at the bottom of the LCD to the timer (looks like a clock).
Press the Set button in the middle of the shift left/right to adjust the delay and number of shots. The number of shots is the number on the left and the delay before taking pictures is on the right in seconds. When you pressed the Set button, one of the numbers started flashing. Use up or down shift to set the value, then left or right to change to the setting.
So if the display shows 06 03” six pictures will be taken at one second intervals after a three second delay.
Press Set again to store the values.
Press the big black button to take the pictures.
Timer Schedule Shooting (Timelapse) – multiple pictures taken on schedule.
Camera: make sure the camera is in single shot mode
Transmitter: use left/right to shift the symbol at the bottom of the LCD to CH then press right again. A new set of symbols will appear at the top of the LCD:
DELAY LONG INTVL N1 REPEAT N2
To set any of these values, use right/left to select the symbol, press Set then use up/down to set the values. Press Set to store.
DELAY – the number of seconds before the sequence begins. This works much like the self-timer of the camera.
LONG – the period during which the exposure is made. The shortest period which can be set is 1 second. So if the camera is on automatic or manual and an exposure time of less than one second is anticipated, one second is a suitable setting. If the camera is on Bulb setting, this is the length of time that the shutter will remain open. So, setting 5 seconds with the camera in Bulb will result in a 5 second bulb exposure.
INTVL – the interval between each LONG, which approximates to the interval between exposures.
Now it gets complex and I’m not sure I fully understand this.
N1 – shooting numbers. This seems to be the number of exposures programmed.
REPEAT – the repeat interval time, the time between exposures.
N2 – the number of times REPEAT is executed.
The last three are not really clear to me and there are complications like N1 cannot be more than 99. If your needs are complex, you will need to experiment. But if you just want to take a picture every few seconds for a moderate number of iterations, this information should allow you to do so. So:
DELAY = 4 secs
LONG = 1 sec
INTVL = 5 secs
NI = 03
REPEAT = 5 secs
N2 = 01
… will give you a 4 second delay, then 3 exposures at 5 second intervals.
I hope you find this useful and gets you beyond the badly translated instruction manual so that you can get some use from this handy gadget.